> ## Documentation Index
> Fetch the complete documentation index at: https://wb-21fd5541-sdk-testing-latest.mintlify.site/llms.txt
> Use this file to discover all available pages before exploring further.
# 코드 트레이스하기
> 실행 중인 코드를 계측해 실행 내용이 W&B Weave에 상세한 트레이스로 표시되도록 하세요.
이 가이드에서는 애플리케이션을 계측해 실행 내용이 W\&B Weave에 상세한 트레이스로 표시되도록 하는 방법을 설명합니다. 트레이스는 입력, 출력, 각 오퍼레이션의 구조를 Call로 캡처하여 LLM 기반 코드를 디버그하고, 평가하고, 모니터링하는 데 도움이 됩니다.
실행 중인 코드를 Weave에서 상세한 트레이스로 보려면 Call을 생성해야 합니다. 다음 섹션에서는 이를 수행하는 세 가지 주요 방법을 자동화 수준이 높은 방식부터 수동 방식까지 차례로 설명합니다:
* LLM 라이브러리 Call 자동 추적
* `weave.op`을 사용한 맞춤형 함수 추적
* API를 직접 사용한 수동 Call 추적
무엇을 트레이스할지에 대해 필요한 제어 수준에 맞는 방식을 선택하세요.
## LLM 라이브러리 Call 자동 추적
Weave는 `openai`, `anthropic`, `cohere`, `mistral`, `LangChain`과 같은 널리 사용되는 라이브러리 및 프레임워크와 자동으로 통합됩니다. LLM 또는 프레임워크 라이브러리를 임포트하고 Weave 프로젝트를 초기화하세요. 그러면 Weave가 추가 코드 변경 없이 LLM 또는 플랫폼에 대한 모든 Call을 프로젝트에 자동으로 트레이스로 기록합니다. 지원되는 라이브러리 인테그레이션의 전체 목록은 [Integrations overview](/ko/weave/guides/integrations/)를 참조하세요.
```python lines theme={null}
import weave
from openai import OpenAI
client = OpenAI()
# Weave Tracing 초기화
weave.init('intro-example')
response = client.chat.completions.create(
model="gpt-4",
messages=[
{
"role": "user",
"content": "How are you?"
}
],
temperature=0.8,
max_tokens=64,
top_p=1,
)
```
```typescript twoslash lines theme={null}
// @noErrors
import OpenAI from 'openai'
import * as weave from 'weave'
const client = new OpenAI()
// Weave Tracing 초기화
await weave.init('intro-example')
const response = await client.chat.completions.create({
model: 'gpt-4',
messages: [
{
role: 'user',
content: 'How are you?',
},
],
temperature: 0.8,
max_tokens: 64,
top_p: 1,
});
```
JavaScript 및 TypeScript 프로젝트의 전체 설정 가이드는 [TypeScript SDK: Third-Party Integration Guide](/ko/weave/guides/integrations/js)를 참조하세요.
자동 동작을 더 세밀하게 제어하려면 [Configure automatic LLM call tracking](/ko/weave/guides/integrations/autopatching)을 참조하세요.
## 맞춤형 함수 추적
LLM 애플리케이션에는 추적하고 싶은 추가 로직(예: 전처리/후처리, 프롬프트 등)이 있는 경우가 많습니다. Weave가 자동으로 트레이스하는 LLM Call와 함께 자체 함수도 캡처하도록 하려면 이 방법을 사용하세요.
Weave를 사용하면 [`@weave.op`](/ko/weave/reference/python-sdk/#function-op) 데코레이터를 사용해 이러한 Call를 수동으로 추적할 수 있습니다. 예를 들면 다음과 같습니다.
```python lines theme={null}
import weave
# Weave Tracing 초기화
weave.init('intro-example')
# 함수에 데코레이터 적용
@weave.op
def my_function(name: str):
return f"Hello, {name}!"
# 함수 호출 -- Weave가 입력과 출력을 자동으로 추적합니다
print(my_function("World"))
```
[클래스의 메서드](#track-class-and-object-methods)도 추적할 수 있습니다.
Weave를 사용하면 [`weave.op`](/ko/weave/reference/typescript-sdk/functions/op)으로 함수를 래핑해 이러한 Call를 수동으로 추적할 수 있습니다. 예를 들면 다음과 같습니다.
```typescript twoslash lines theme={null}
// @noErrors
import * as weave from 'weave'
await weave.init('intro-example')
function myFunction(name: string) {
return `Hello, ${name}!`
}
const myFunctionOp = weave.op(myFunction)
```
래핑을 인라인으로 정의할 수도 있습니다.
```typescript twoslash lines theme={null}
// @noErrors
const myFunctionOp = weave.op((name: string) => `Hello, ${name}!`)
```
이는 함수와 클래스의 메서드 모두에 적용됩니다.
```typescript twoslash lines theme={null}
// @noErrors
class MyClass {
constructor() {
this.myMethod = weave.op(this.myMethod)
}
myMethod(name: string) {
return `Hello, ${name}!`
}
}
```
### 클래스 및 객체 메서드 추적
독립형 함수 외에도 클래스 및 객체 메서드도 추적할 수 있습니다. 메서드에 `weave.op` 데코레이터를 적용하면 클래스의 모든 메서드를 추적할 수 있습니다.
```python lines theme={null}
import weave
# Weave Tracing 초기화
weave.init("intro-example")
class MyClass:
# 메서드에 데코레이터 적용
@weave.op
def my_method(self, name: str):
return f"Hello, {name}!"
instance = MyClass()
# 메서드 호출 -- Weave가 입력과 출력을 자동으로 추적합니다
print(instance.my_method("World"))
```
**TypeScript에서 데코레이터 사용하기**
TypeScript 코드에서 `@weave.op` 데코레이터를 사용하려면 환경이 올바르게 설정되어 있는지 확인하세요.
* **TypeScript v5.0 이상**: 데코레이터가 기본적으로 지원되며 추가 설정이 필요하지 않습니다.
* **TypeScript v5.0 미만**: 데코레이터에 대한 실험적 지원을 활성화하세요. 자세한 내용은 [데코레이터에 대한 공식 TypeScript 문서](https://www.typescriptlang.org/docs/handbook/decorators.html)를 참조하세요.
트레이싱을 위해 인스턴스 메서드에 `@weave.op`을 적용할 수 있습니다.
```typescript twoslash lines theme={null}
// @noErrors
class Foo {
@weave.op
async predict(prompt: string) {
return "bar"
}
}
```
클래스 내 유틸리티 함수를 모니터링하려면 정적 메서드에도 `@weave.op`을 적용할 수 있습니다.
```typescript twoslash lines theme={null}
// @noErrors
class MathOps {
@weave.op
static square(n: number): number {
return n * n;
}
}
```
### 병렬(멀티스레드) 함수 call 트레이스
기본적으로 병렬로 실행된 Call은 Weave에서 각각 별도의 루트 Call로 표시되어 트레이스 계층을 따라가기가 어렵습니다. 동일한 부모 Op 아래에 올바르게 중첩되게 하려면 `ThreadPoolExecutor`를 사용하세요.
다음 코드 샘플은 [`ThreadPoolExecutor`](/ko/weave/reference/python-sdk/trace/util#class-contextawarethreadpoolexecutor)의 사용 예를 보여줍니다.
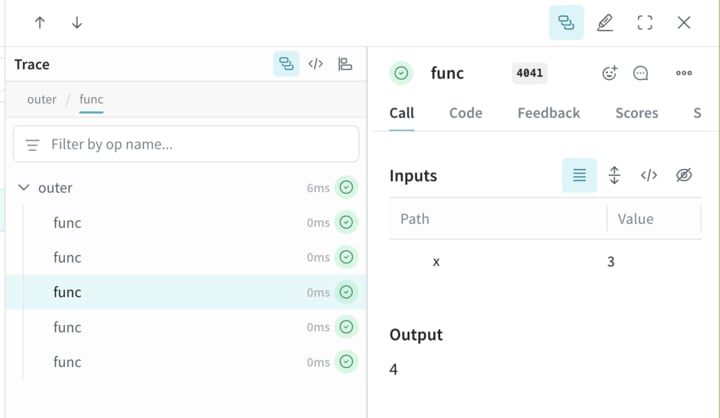
첫 번째 함수인 `func`는 `x`를 받아 `x+1`을 반환하는 단순한 Op입니다. 두 번째 함수인 `outer`는 입력 목록을 받는 또 다른 Op입니다.
`outer` 내부에서 `ThreadPoolExecutor`와 `exc.map(func, inputs)`를 사용하면 `func`에 대한 각 Call이 동일한 부모 트레이스 컨텍스트를 계속 유지합니다.
```python lines theme={null}
import weave
@weave.op
def func(x):
return x+1
@weave.op
def outer(inputs):
with weave.ThreadPoolExecutor() as exc:
exc.map(func, inputs)
# Weave 프로젝트 이름을 업데이트하세요
client = weave.init('my-weave-project')
outer([1,2,3,4,5])
```
```text theme={null}
이 기능은 아직 TypeScript SDK에서 사용할 수 없습니다.
```
Weave UI에서는 이렇게 하면 중첩된 하위 Call 다섯 개를 포함하는 단일 부모 Call이 생성됩니다. 증가 연산이 병렬로 실행되더라도 완전한 계층형 트레이스를 얻을 수 있습니다.
## 수동 Call 추적
자동 인테그레이션이나 `weave.op` 데코레이터가 워크플로에 맞지 않는 경우, API를 직접 사용해 Call을 수동으로 생성할 수 있습니다. 이 방식은 더 많은 보일러플레이트 코드가 필요한 대신, Call의 시작과 종료 시점을 완전히 제어할 수 있습니다.
```python lines theme={null}
import weave
# Weave Tracing 초기화
client = weave.init('intro-example')
def my_function(name: str):
# Call 시작
call = client.create_call(op="my_function", inputs={"name": name})
# ... 함수 코드 ...
# Call 종료
client.finish_call(call, output="Hello, World!")
# 함수 호출
print(my_function("World"))
```
```text theme={null}
이 기능은 아직 TypeScript SDK에서 지원되지 않습니다.
```
* Call 시작: [POST `/call/start`](https://docs.wandb.ai/weave/reference/service-api/calls/call-start).
* Call 종료: [POST `/call/end`](https://docs.wandb.ai/weave/reference/service-api/calls/call-end).
```bash lines theme={null}
curl -L 'https://trace.wandb.ai/call/start' \
-H 'Content-Type: application/json' \
-H 'Accept: application/json' \
-d '{
"start": {
"project_id": "string",
"id": "string",
"op_name": "string",
"display_name": "string",
"trace_id": "string",
"parent_id": "string",
"started_at": "2024-09-08T20:07:34.849Z",
"attributes": {},
"inputs": {},
"wb_run_id": "string"
}
}
```